
It’s time to grow!


Step 1: Indoor vs Outdoor
The first step in growing Cannabis is to choose the right location, either indoors or outdoors. If you’re unsure, please read our article: Outdoor vs Indoor Cannabis-Anbau
If you’re still unsure after reading that, consider the following:
a) Do you have a luminous garden or balcony? Meaning the chosen location has more than 12 hours of direct light during the summer months, then we recommend you to grow outdoors. Proceed to step 2. If not, consider growing indoors (see b).
b) How big do you want your yield to be? If you want a high yield from one plant, consider buying a grow tent and equipment (lights, fan, hygrometer, Fyta Beam, etc.). If you leave your plant on the windowsill it will grow less and produce less buds. Ideally you should have around 10 to 12 hours of direct sunlight for a descent yield.

Step 2: Autoflower or Photoperiodic?
Unless you have a clone or a cutting from a plant, you’ll be growing from seeds. It’s important to know what type of plant you have no matter if you start with a seed or a cutting.
Autoflowering strains will flower regardless of their light schedule, while photoperiodic plants need a change in their light cycle to bloom. Autoflowering plants are popular for beginners and outdoor growers because they don’t require a light schedule change and have faster life cycles, typically going from seed to harvest in 3 to 6 months. This makes them ideal for outdoor cultivation in northern latitudes like Germany. Autoflowering varieties are hybrids of ruderalis varieties, which are originated in colder regions of Europe, Asia, and Siberia.

Step 3: Light
If you’re growing outdoors, you usually won’t need extra lights if you start growing at the right time. In southern Europe, like Spain or Italy, sowing should start indoors in March and plants should be moved outside in April. Harvest typically occurs from September to November. In northern Europe countries, like Germany, sowing should begin indoors in March or the end of April as the latest. Plants can be moved outside in May. Due to the colder climate, autoflowering plants are preferred because of their faster life cycle. You can expect to harvest in September or October at the latest.
Indoor growers will need supplemental lights. It can be overwhelming at first due to the number of options of grow lights on the market. We recommend a full spectrum LED light for beginners. This way, you don’t have to worry about changing the light spectrum as with fluorescent lamps or dealing with the extra heat produced by high-intensity discharge (HID) lamps. LED lamps are easy to use, have fewer parts to assemble, and are the most cost-efficient lamps on the market. The only downside is that high-quality LED lamps can be quite expensive. They also produce some heat, but this can be easily managed with good ventilation.

Step 4: Pot and soil mix
There are many methods to grow cannabis, such as hydroponics and in coco coir. However, these methods aren’t usually recommended for beginners.
If you’re a novice, which is likely since you’re reading this article, it’s advised to start with regular soil or potting mixes. This method is also suitable if you plan to grow outdoors, as you can grow in a pot and move it outside when there’s enough light during the growing season. If you choose this method, consider the size you want your plant to be and the number of plants you can manage. As a beginner, it’s recommended to start with one plant and consider more as you gain experience.
When choosing a pot, keep in mind that autoflowers are usually smaller and do well in pots of 10 to 15L. This size also works for photoperiodic plants as it limits vertical growth. You can opt for larger pots up to 30L or 40L for photoperiodic plants, but remember this also means more soil, nutrients, water, and ultimately more work. Also, some plants, depending on their genetics, can grow taller than 2 meters. If this doesn’t bother you, you can transplant your plants to the ground after germination. However, this requires preparing the ground soil in advance to ensure healthy plant growth.
Once you’ve decided on the pot size, consider the material. For cannabis cultivation, fabric pots, also known as smart pots, are popular. They’re made from a horticultural fabric that prevents roots from growing out of the pot and their porosity makes overwatering difficult. Clay pots are another option to consider, especially for outdoor pot growing. They help prevent overheating in regions with hot summers. Ensure these pots have a drainage hole to avoid overwatering. Plastic pots are also a good choice if you’re on a budget. They allow for easy hole-punching when training your plant. For outdoor growing, you can choose a white pot to prevent overheating of the root area during summer months. Consider using rectangular pots for indoor growing in a grow box to maximize space, but round pots will also suffice.
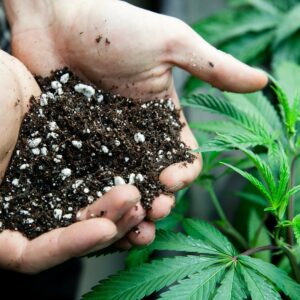
You can either buy ready-to-use soil from a cannabis store or prepare it your own. If you choose the latter and plan to grow directly in the ground, ensure your soil is loamy. Clayey, silty, chalky, peaty, and sandy soils are not recommended for cannabis cultivation. Loamy soils are composed of 20% clay and 40% each of sand and silt. If you decide to grow in a pot, you can use universal soil and improve its aeration and drainage by adding perlite and coco coir. You can also add mycorrhiza to enhance nutrient uptake and yield. Simply follow the instructions of the product you choose.

Step 5: Germination
When your soil and pots are ready, you can start germinating your seeds. Remember, autoflowering species are very sensitive and should be transplanted a maximum of once. Therefore, it is advisable to plant them directly into the soil. However, if you want to control the process, you can opt for different germination kits available, including Jiffy kits, which are easy-to-use kits for germinating seeds with instructions.
Alternatively, you can germinate the seeds yourself using herb or germination soil. Choose a small pot with a diameter of around 5 to 7 cm. You can also use a plastic cup, but remember to make small holes for drainage. After filling the pot with germination soil, make a small hole in the substrate (approximately 2 cm deep) to place your seed. Afterward, cover the seed with some soil and water generously.
Another popular method for seed germination is the paper towel method, where you place your seed on a heavily dampened paper towel and cover it with another wet towel. Keep this in a closed plastic zip bag in a dark environment. Check after 24 hours and continue checking daily until you see the first root, or radicle, of your plant. Normally, you can transplant when the radicle is around 1-2 cm long. Germination varies from 1 to 7 days. This method is recommended for old seeds, i.e., seeds that have been stored for more than a year, as it is the fastest way to determine if your seed is still viable.
Another practice you may have heard about is the soaking method, where growers submerge their seed in water for 2 to 12 hours. However, this should not be necessary if you have good quality seeds.
Once you see the first two small baby leaves, called cotyledons, your plant has reached the cannabis seedling stage. Update the grow stage in the FYTA App.

Use the FYTA Beam as your personal plant assistant – For delicious buds that exceed all expectations!